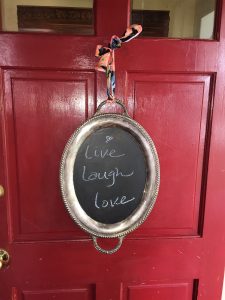
Silver serving trays have become a thing of the past as many of us prefer to entertain less formally these days. However, these classic pieces now have a new role: one-of-a-kind chalk boards!
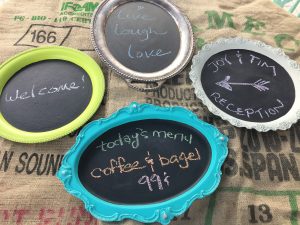
Dust off that old heirloom and give it new life. These whimsical chalk boards are a welcoming, friendly way to greet visitors, leave messages for family members or direct guests to a wedding or alumni reception. This piece will go from forgotten in the back of the cabinet to center stage at your next function.
Ability level: Easy for sure—no sharp edges.
Age Level: Perfect for DIYers of all ages and skill levels.
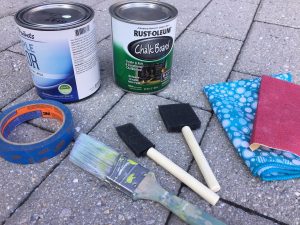
Items needed:
1. Silver serving tray
2. Chalk board paint
3. Painter’s tape
4. Other latex paint
5. Paintbrushes
6. Sandpaper
7. Stick on picture hanger or small easel
8. Chalk
Time requirement: Once all items are purchased and/or collected, 1.5 hours (not including paint drying time)
Cost: Approximately $15 per Serving Tray Chalk Board
$6 per silver tray
$9 for a can of Chalk Board Paint (this project only uses a small amount so lots left over for creative projects)
$3 for Painter’s tape (will use just part of a roll)
$2 for hangers or a small easel
$1 for chalk

Step 1- Let’s Go Silver Mining
Part of the fun is the hunt, so time to play “Miner” in search of silver… silver trays that is! Goodwill is the ideal place to start looking so head to your local store and explore the Housewares Section. I recommend using trays that are as big as possible to give you room for writing messages; I also like trays with handles which can be used to hang your future chalk board. Also, look for silver trays with detailed edges to give your piece some interesting accents. (This project could also be done with wooden or regular metal serving trays; chalk board paint can transform any item and give you a unique place to express yourself. A chalk board-painted globe is a hit with kids!)
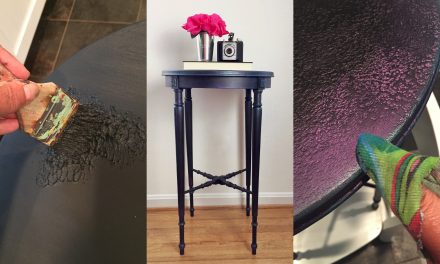
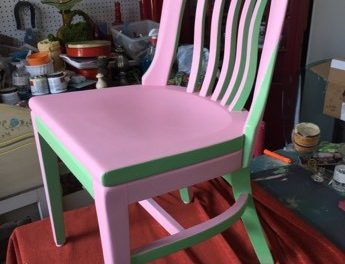
Step 2- Painting & Sanding Adds Personality
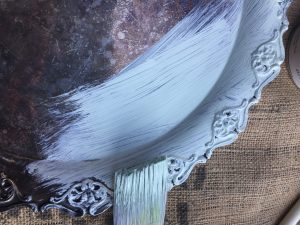
After you have wiped down your tray with a wet rag or paper towel then dried it off, use any latex paint you have around the house or pick up a small can; have fun with your color choice. Paint with primer already in it is a great option to ensure the paint adheres well. You might consider selecting a hue to compliment your wedding theme or to match your school’s colors. Paint the entire front of the tray and ensure you get in all the grooves and spaces around the edges. Just do a quick, light first coat; the silver beneath or along the edges may show through; your second coat of paint will take care of it. To add additional interest, consider painting the second coat with a complimentary color. Give each layer time to dry.
After the paint has dried, use sand paper to very, very lightly buff the edges to bring out the silver underneath. The details will pop out to add more charm! This light sanding will create paint dust so be sure to wipe or blow it off before the next step.
(As you are able to see in the pictures, one tray was not painted but left its original silver. This is an option, too. Just start the process with the next step.)
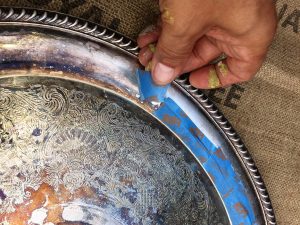
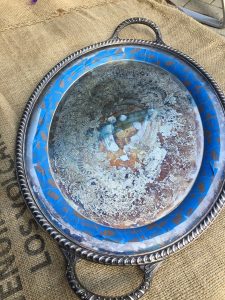
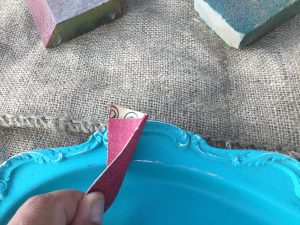
Step 3- Painter’s Tape to the Rescue
Take your painted and sanded tray (or if you like, an unpainted silver tray), and start placing small pieces of painter’s tape to outline the area that will be the chalk board. There might be an edge to use as a guide. This step will take a little bit of time but will pay off. If children are participating in the project, you might want to do this part for them so the final product looks sharp.
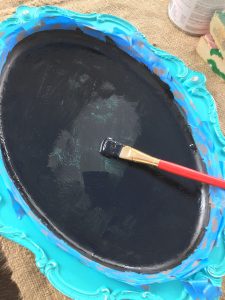
Step 4- Love Me Some Chalk Board Paint!
Use an inch or so wide brush to apply the chalk board paint inside the painter’s tape border you created. Make sure you cover the entire space with a light coat. You will likely see the paint color below showing through; the second coat will cover it. Unlike the paint you used for the base coats, I suggest you let the chalk board paint only dry an hour or so before adding the second coat.
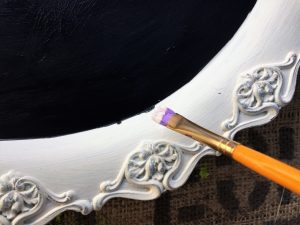
Step 5- Carefully Remove the Tape
After applying the second coat of chalk board paint, begin to carefully remove the painter’s tape. With the chalk board paint still being wet, be careful not get it on the tray’s edges. (I found leaving the chalk paint dry overnight made it stick to the painter’s tape then pulled off the tray when the tape was removed.) After you remove the painter’s tape, you might need to take a small brush to touch up the first coals of paint where the chalk paint bled a little bit under the tape or if any of the chalk board paint got pulled up with the tape removal. Once the touch ups are done, please leave it to dry overnight.
Step 6- Add a Hanger or Use an Easel
Place in the easel or turn the tray over to stick the picture hanger on it. Your tray is now ready for its new life as a chalk board and to receive compliments from all who see it!

Step 7- Chalk One Up!
The last step is the most fun! Write a message fitting of your silver tray turned chalk board. This transformed piece can be used in so many ways and places. So many possibilities!
What else could you transform to give it a new function?

Tim Kime is an artist, life coach, connector. He is President of Kime Leadership Associates offering executive coaching, meeting facilitating and motivational speaking. He is also Chief Creative Force of Transformation Junkies which upcycles furniture and other household items into functional works of art. He combined his two passions—unleashing the potential in people and transforming items with the launch of the Art of Possibilities Workshops. These workshops are part upcycling, part dreaming, part goal setting.