
Make Goodwill-Found Lamps Bloom with Painted Shades
Create a functional, blooming work of art by painting a Goodwill-found lamp with colorful flowers. Upcycle a nice lamp into a flowering art piece by painting its shade. This easy DIY project will plant seeds of transformation and beauty by creating a unique and one-of-a-kind light fixture. Fresh flowers come and go, but this upcycled project will bloom for years to come.


Here’s how:
Step 1: Get out of the heat by finding cool items at Goodwill
Yes, the temperature is rising, so use the weather as another excuse to venture over to your nearby Goodwill nonprofit retail store. The deals at Goodwill are always hot, and your purchases (and donations) go to support their life-changing programs.
While there, check out the section housing lamps and other electronic devices. Look for a lamp with a base you like AND one with a simple shade covered in a neutral, design-free fabric. Consider the shade a round and curvy blank canvas on which to be creative.


Look in the aisle with office, school, and art supplies to see if there might be craft paints and paint pens for sale. You might get lucky and find what you need. AND, consider joining Finding Your Good and Tim Kime Art on Wednesday, June 26, from 6 p.m. to 8 p.m. We are having our latest Art Supply Swap event at Brookland’s Art Walk (716 Monroe Street, NE, Washington) that evening, and you are likely to find good stuff there.
Please join us, bring your supplies to swap and share. Good people will be in attendance—that is for sure!


Step 2: Brush on the background
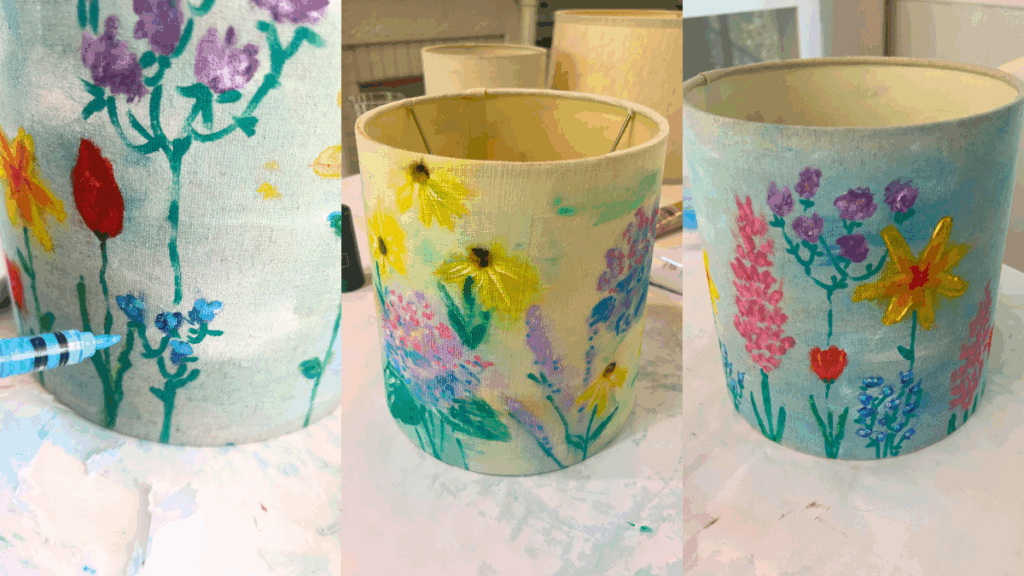
Use some light tones and a bigger brush to apply some background colors. Two of the shades featured here got broad strokes in blues, greens and gold, the third mimics the sky with whites and blues.
The paint was thinned out using lots of water as the strokes were applied. This will give your shade a watercolor/impressionist look and feel.


Expert Tip:
Don’t overthink how you are applying the paint. You want the feel to be organic and flowing as well as light and airy. You can’t go wrong as the colors will create a soft backdrop for your flower designs.
Step 3: Paint on the posies & plants
Ideally, you will start adding your flowers, along with their leaves and stems, while the background is still damp. This will add to the watercolor-feel and look of your shade. Start by adding the flower petals.
Brush them on, consider adding a layer or two, allowing them to blend together.
Add a center in a different color.
Use a very small paintbrush and apply green as stems and leaves. You might consider using a green paint pen to add them.
As you are able to see, I took three different approaches for the three shades.
1. One has hydrangeas, daisies, and other flowers; some have leaves, some have stems. They are randomly placed on the shade and are spaced out so that you see some of each kind of flower wherever you look.
2. On the second one, a row of flowers sprouts along the edge. The flowers/petals/blooms were added first, again ensuring each kind of flower was visible from all angles. Green paint was used to add stems and various shapes of leaves.
3. For the third shade, sunflowers and big leaves were used to make the shade bloom. They were placed throughout the shade; each sunflower has a leaf or two, which are simply triangles of green with details.


Step 4: Add accents, details with pen paints
Return to each flower and use a small detail paint brush and/or paint pen to add additional color and dimension. Some petals got extra layers to call attention to them. Some flower centers got “dotted” to make them stand out.


Vines were drawn onto leaves to make them look more interesting. This step was really exciting and fun because it made each lamp shade truly come to life!


Step 5: Position with joy, add accessories & let your light shine!
These flowering lights will be a friendly, inviting addition to any space in your place. Set one on a nightstand, side table, or foyer cabinet and add a handsome clock, a picture frame, or a stack of books—all available at Goodwill, too.


Wherever this functional and flowering work of art calls home, it will surely make your face bloom with a smile and your heart flower with happiness!


Similar Reads:
- DIY: How to Upcycle Mannequins into Pride Art Pieces – Finding Your Good
- DIY: How to Upcycle a Mirror to Reflect Your Pride – Finding Your Good

Tim Kime
Artist, Motivational Speaker, Life Coach

