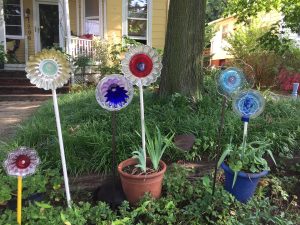
Oh, the Dog Days of Summer! This time of year, your garden might be withering from all the heat, so here is an easy and whimsical way to add floral flair that will always be fresh, bright, and blooming: Garden flowers made from plates (and other discarded kitchen items). They are sure to be the talk of your cook out or pool party and are a charming addition to any sized yard, outdoor space, or container garden. Green thumb not required, just a little creativity and time.
Ability level: Easy as pie
Age Level: Kids of all ages (although little ones will need some help with gluing flower pieces, sawing the stem, and “planting” it when done).
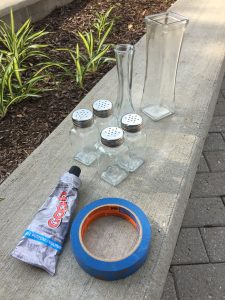
Items needed:
1. Candy dishes, deviled egg holders, small metal bread baskets or tin Jello molds; any item that has petal shapes or scalloped edging
2. Clear glass plates of varying sizes, ideally with color and/or with flowering shapes
3. Glass candle holders, votives or small, short vases, again ideally with color
4. Old buttons, earrings, brooches or marbles to add bling for the flowers’ pistals (center)
5. Square, glass salt & pepper shakers or small, square glass vases
6. Old drapery rods, broom handles or plastic PVC piping for stems
7. One tube of Goop glue
8. Painter’s tape
Time requirements: Once all items are purchased and/or collected, a half hour per flower plus two days drying time
Cost: $10 (at the most) for items plus glue ($5), Painter’s tape ($5)
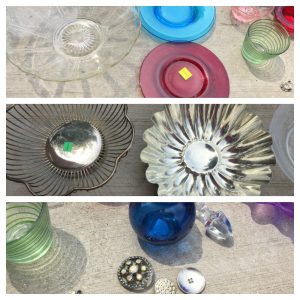
Step One: Planting the Seeds/Hunting for Pieces
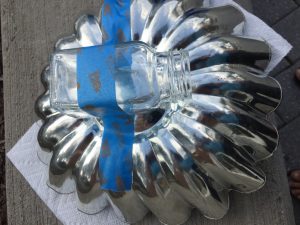
As you visit your favorite Goodwill store, head to the Housewares section to look for the basic components of your flower: clear glass plates, candy dishes, votives or metal bread baskets. When I went hunting, I was drawn to items that already had flowery shapes to them. I can’t decide if I like the jello mold or deviled egg holder the best. Both said to me, “I am a flower! Take me home!” These will be the building blocks for your blooming art. You will be laying them out from bigger to smaller item. Be sure to add at least one item with color to make it eye-catching.
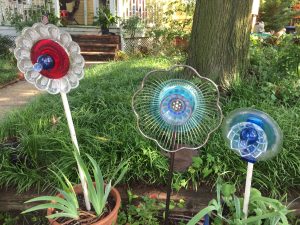
After the base, add a smaller plate then finish with a smaller item like a votive or candle holders. (I hit the jackpot by finding stubby, round vases in bright hues.)
The cherry on top, or the final step of determining your flower’s look, is adding its center. I used some old sparkling buttons; earrings, brooches, glass marbles and even small Christmas ornaments are great options, too. (In fact, these flowers make fun Christmas Tree toppers but that’s for another date and season!)
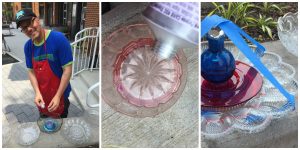
Step Two: Creating Your Flower
Once you have tried various combinations of items, colors, shapes and textures, pick one that makes you smile. You might even choose colors that are a loved one’s favorite as these make the perfect birthday or special event gift.
Start with the base of the flower, the biggest plate or dish. For the next layer, add a generous amount of Goop to its bottom/underside then place in the center of the base item. Don’t worry if you don’t lay it down perfectly. You have the chance to move it as the glue dries clearly and takes time to dry. Continue the process by adding the candle holder or votive now. Same process: glue on the bottom and place on the center of the next layer. Finally, add glue to the earring/button/ brooch (the bling!) and add that to the center too.
To ensure your flower stays in the way you want it to and doesn’t slip or slide while the glue dries, use Painter’s tape to hold in place. Let it dry at least for a day (if you are like me, it was hard to wait) to ensure a strong bond before the next step.
Step Three: Adding the Stem Holder
For this next step, remove the Painter’s tape and turn over your blooming creation. Carefully place your flower backside up; if your item has a center that is not flat, you might need to use a small box on which to set it; you just need to make sure it is flat for this step. Take the lid off the salt & pepper shaker. Determine where on the back of the plate has the flattest part. Some plates or dishes have bumpy backs so find the place with the most surface on which to use. Add glue to one side of the shaker (or square, slim vase). Put in place and use Painter’s tape to hold it tightly. Again, leave to dry for a day to ensure the glue has time to cure. Your patience will pay off, I promise you!
Step Four: Cutting the Stem
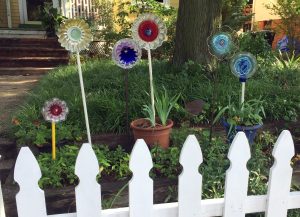
After you have allowed a day for the glue to adhere well between the shaker and the plate, remove all painter’s tape. Now, you will be adding your stem to the flower. Make sure your tube/drapery holder/broom handle fits inside the stem holder. Determine the height of your flower; this will be based on where it will be. For a garden with multiple flowers, I strongly suggest a variety of stem heights to add visual interest. Carefully cut the stem (adults only with sawing!).
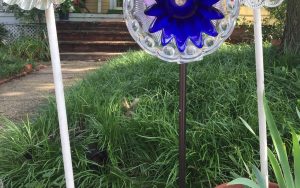
Step Five: Getting into the Garden!
You have your flowers. You have your stems. Now get out into the garden (or onto the balcony or wherever you will add these charming, conversation pieces). Place the stems securely in the ground; you might be able to insert them using your body weight rather than having to dig a hole. Add your flower onto its stem by inserting the stem into the stem holder.
That’s it… you now have a blooming piece of art in your outdoor space that will surely attract attention and will ensure your garden looks vibrant, no matter the temperature or forecast.
Tim Kime is an artist, life coach, connector. He is President of Kime Leadership Associates offering executive coaching, meeting facilitating and motivational speaking. He is also Chief Creative Force of Transformation Junkies which upcycles furniture and other household items into functional works of art. He combined his two passions—unleashing the potential in people and transforming items with the launch of the Art of Possibilities Workshops. These workshops are part upcycling, part dreaming, part goal setting.


Great idea! Fun, colorful, and creative!