Now that large, flat screens are the trend, what do we with those old television sets? Upcycle them with other items into funky storage stations! This unique DIY project will have you dropping the remote with excitement!
Age level: Older teens and adults
Items needed:
1. Small television set
2. Wooden pepper grinder (or large wooden candle holder)
3. Scrap wood
4. Screws
5. Screwdriver
6. Drill
7. Wood glue or Goop
8. Two colors of spray paint
9. Cup hooks
Time requirement: 2 hours (not including paint and glue drying time)
Cost: $15
- $0 for old television set
- $5 for wooden pepper grinder or large wooden candle holder
- $5 for spray paint, per can
- $4 for wood glue or Goop
Step 1: One person’s trash is another person’s treasure
Okay, I confess. I am a dumpster diver.
It is truly amazing what people toss out that has potential for a new life with just a bit of vision and a little effort.
In my studio building’s trash room, a lonely little television set was discarded and destined for the landfill.
If a TV can be considered cute, this little one certainly was, so it went home with me for this funky DIY project!
Step 2: See great “re-runs” when you shop at Goodwill
Rather than trashing things you no longer want, take them to Goodwill where they will be given a new episode in someone else’s life (and place!).
Goodwill does thoughtfully screen donations (they don’t accept certain technology pieces, mattresses and worn/ heavily damaged broken items) so that great and different things are in the store daily—including the pepper grinder, small cutting board, cup/mug set, small vases and books used for this project!
I knew I wanted to upcycle the old TV set into a small storage unit and wanted to raise up to give it more “umph.”
In the wooden Household Items aisle at Goodwill, I hunted for an item that could be enlisted as a pedestal for this project.
While I was thinking I would use a wide, wooden candle holder for this purpose, I found a pepper grinder that was picture perfect! It was heavy, solid and a great design. A small, folding knife holder was found and later taken a part for the base.
Look for project accessories, too, while at Goodwill. They have all sorts of small mugs, tea pots, and other items that can be used to make this project fun and functional.
Step 3: Take apart the TV
- If you come across a television set to transform, then carefully deconstruct it, keeping the various screws that hold it together in a safe place.
- Consider this part of the process like playing detective. You are looking for the ways the pieces are held together then dismantling it part by part.
- Place all of its insides in a container so you can take it to a technology reuse or recycle center. You want to get down to the plastic “shell” of the set. After it guts are removed, you will likely need to wipe it out to remove any dust and dirt.
Step 4: Prepare your pedestal
- To give the piece more prominence and additional storage space, you will want to find something on which to place the television set shell. The heavy wooden pepper grinder was ideal and only required the removal of several screws to take out its inside grinding mechanism.
- A wider wooden candle holder is a great option, too. To provide a bigger base on which the television set shell will sit, find a piece of scrap and cut it to size. A folding knife holder was taken a part and its pieces used for this step. Again, you never know what you will find at Goodwill to transform!
- Trace the top of the pedestal piece on your scrap piece of wood.
- Drill holes, add wood glue or Goop and screw securely into place. Your pedestal platform is now ready to hold the TV piece!
Step 5: Make a connection
Time to secure your TV shell to the base.
- Add wood glue to the top of the pedestal piece and place your TV shell on it so that it is in the center.
- Drill small from the inside of the TV into the wood base below.
- Screw in screws to hold it in place; the wood glue will help to secure it firmly.
Step 6: Spray on splashes of color
- Place your TV storage station on a drop cloth outside or in a well-ventilated area.
- With one bold color of paint, spray the inside of the old TV. Don’t worry about a perfect first coat; add several light layers. You’ll want to come at this step from a variety of angles to get all inside edges covered.
- Grabbing your second fun color, spray the outside of the storage station.
- Lay the unit on its front, sides and even upside down to ensure it is covered well.
- As with all spray painting, add a light coat and then dry.
- Go back your piece several times with more thin layers. Let dry between each coat.
Step 7: Get hooked
After your piece has dried, lay it on its back to drill holes for cup holder hooks to provide more storage space.
Insert and screw them into place. (You could also do this step before your paint so that the hooks get painted, too, and blend in with the other parts.)
DONE! You will see so many ways to use it!
You might need a TV guide to decide which way you want to use this truly cool and unique storage unit.

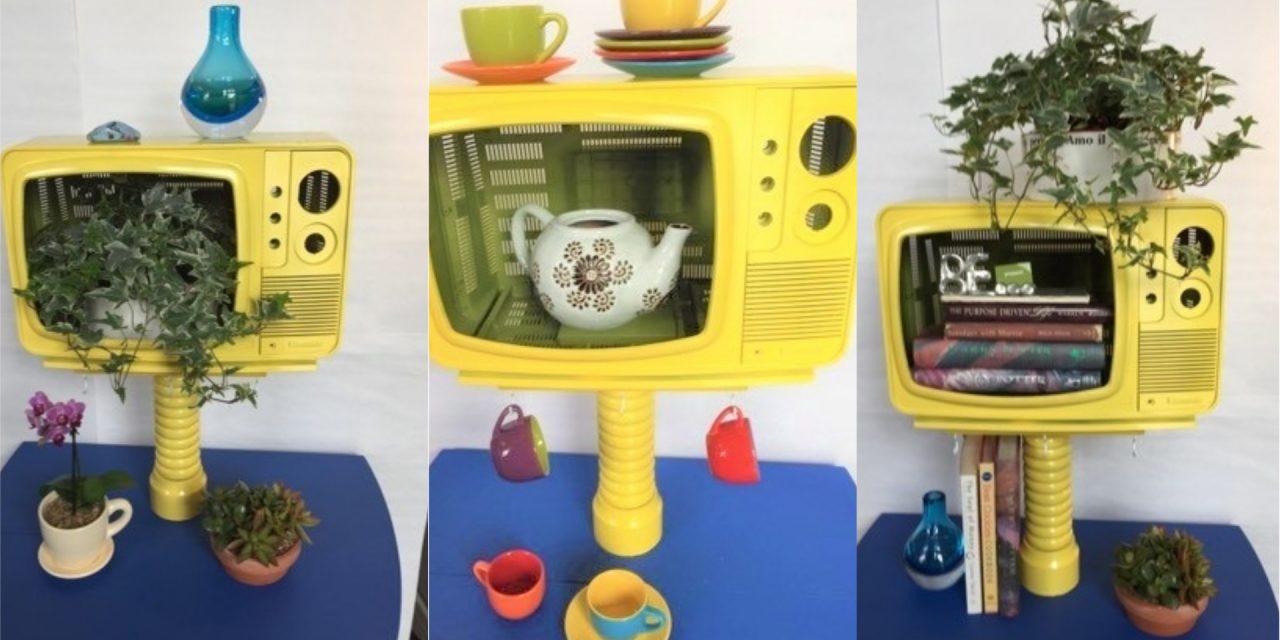
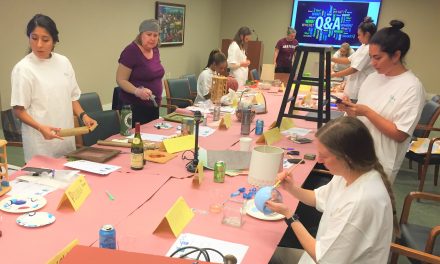
A gorgeous plant stand! Coffee station!
- What about a coffee station?
- Hang mugs from the hooks, add your tea pot inside and place your sugar container on top.
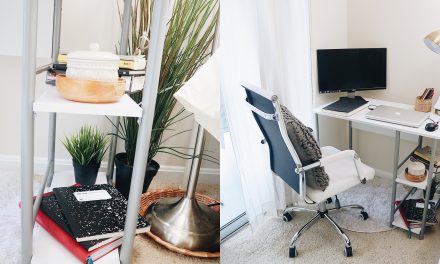
- Or add books inside, on top and beside it.
- This makes a great plant stand, too, so pick up ivy or a spider plant so it flows out the set.
- Or what about using it to hold your jewelry or toiletries? It could hold your business cards and corporate brochures.
No matter how you use this TV set storage station, you won’t want to change channels on it!

