
Show Your Pride by Creating Art with Word Décor as Stencils
Use your creative talents and good shopping skills by turning Goodwill-found word décor into stencils for Pride-related art pieces. This is a simple and colorful way to make one-of-a-kind pieces to celebrate your Pride in June—and all year long.


Step 1: Find your good, show your Pride by shopping for items at Goodwill
Your favorite nearby Goodwill nonprofit retail store is always a welcoming place for folks from all backgrounds and places. The team there will welcome you with open arms—and great deals—as you find for your good there.
Often, you see word décor available made from wood, metal, and other materials. Love, Hope, Peace, Joy, and family are words you might come across during your next adventure at Goodwill. Pick them up for sure!
Also, hunt for canvases to use as the base/foundation of your Pride art piece. There is no need to worry about the existing images or their current colors.
As you plan for your next Goodwill excursion, consider making a donation. Your gifts will help Goodwill offer its life-changing programs to others. If possible, put like-items in bags (clothing in one, school supplies in another), then drop them off and get your receipt for tax purposes. Everyone wins when you shop at Goodwill!


Step 2: Neutralize your canvases
Use a big art brush to cover any existing images on your Goodwill-found canvas. Apply paint to hide any images and create a solid, neutral backdrop for your Pride art. As you can see, white, black, and tan tones were used to make the background disappear and help the bright colors pop.
Step 3: Trace or stamp your word décor on your canvas
Based on the size of your word décor, you might consider putting it on your now neutralized canvas and tracing around it with a pen, pencil, or marker.
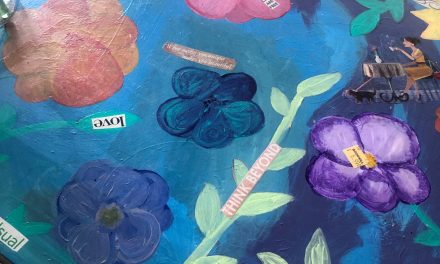
The wooden “Love” used here was large enough to remove easily. After it was removed, I went back with my Sharpie to fill in parts too tight for the marker.


The smaller, metal “Love” was too small to trace, so a rainbow of craft paints was brushed on its back, and it was placed in the center of the canvas. The image left behind was the guide for filling in with more paint.


Step 4: Add rainbow colors with paints or paint pens
As you will remember from grade school (I think that’s when I learned it!), the colors of the rainbow are ROYGBIV: red, orange, yellow, green, blue, indigo, and violet.


Use a small paint brush or your paint pens to apply craft paints in those colors, starting with red at the top of your traced or stamped-on word. Continue applying paint and go through those colors so your rainbow comes to life. Allow time to dry, then return with your brush or your paint pen to add more layers and touch up any parts.


Step 5: Outline to make it stand out
After your rainbow-painted “Love” has dried completely, return to it and use your paint pen or your Sharpie to outline your letters. This step will give the letters a nice, crisp border that will make the words stand out even more from the background.


This was such a fun step because it made things pop with Pride!
Whether you share or keep your Pride art piece, we know it will be displayed with pride, too, because you created something vibrant, colorful, and reflective of your DIY talents, your shopping skills, and your care for others and our planet! Yes, everyone wins when you partner with Goodwill!


Similar Reads:
- DIY: How to Upcycle Mannequins into Pride Art Pieces – Finding Your Good
- DIY: How to Upcycle a Mirror to Reflect Your Pride – Finding Your Good

Tim Kime
Artist, Motivational Speaker, Life Coach

